Queen Rearing Part 2
Queen Rearing Overview Part 2
There are some very sensitive issues in raising queens and grafting is one of these. How well you graft determines the success of the queen's overall development. 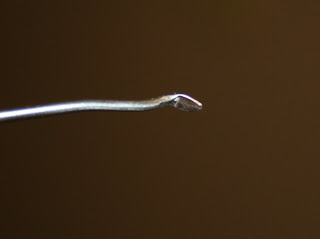 TOOLS! There are many different grafting tools. I have tried all of them. Probably the more common grafting tools are the ones that look something like a dentist's tool, but shaped differently on the end, like this one in the picture.
Many folks make their own out of wooden tooth picks, plastic or metal. There are some very expensive, fancy tools that eject the graft from the spoon once placed in the cell. Others come equipped with a magnifying glass attached to the tool. Grafting does take exceptional eyesight, which very few of us have over the age of 40. So, some sort of reading glasses or magnifying glass along with a good light will be of much help. A tool that has worked well for me is the Chinese grafting tool. It has a tongue that slips under the larvae and draws it out. It has a spring loaded plunger that helps push the graft off onto the bottom of the cell cup. I'm pretty fast with this tool now, and sometimes speed is important, otherwise the royal jelly in the cell can dry out if you take too long grafting. These are inexpensive, around $5. It's hard to keep them clean, and the tool must be very clean when doing grafts. So, some people throw these away after they start looking too
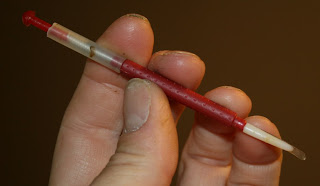 dirty. So you have a tool, now what. I mentioned in my first lesson on queen rearing that you need to establish a starter hive. This can be a smaller 5 frame nuc box with lots of nurse bees, very young bees which you can shake off of a frame of larvae and sealed brood. Do not place frames of open larvae in the starter, just a frame of honey and pollen. Overcrowding this starter nuc is important. Get this starter hive prepared and ready so that when you do your grafting, you can quickly place it into your starter hive.
Now, with close up eye wear on, a good flash light and the grafting tool of your choice go and pick out a good frame to graft from. Remember, get the frame from the hive that has the characteristics that you want to keep. Usually it needs to have proven itself over a couple of years to be sure these are traits not just a fluke. Remove the frame from the hive and brush the bees off. Try not to shake the frame in an attempt to remove the bees. Carry the frame into the area where your tools are ready, where you'll be doing your grafting. Here we go!! I like to lay down a moist cloth beneath the frame I'm grafting from to increase the humidity, keeping the grafts moist. You must be careful to select the youngest larvae possible. Not a egg standing upright, but a larvae that has just started to lay in the base of the cell with the slightest curve. A full curve is too old. 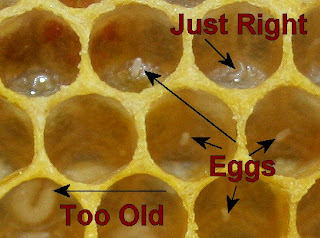
Notice in the picture that you are looking for a slightly curved larvae. It is best to scoop up the larvae from the opened end of the curve. And remember, you must place the larvae in the new cell on the same side it was on when you removed it so that the larvae will continue to breath from that side. I took this picture just for you, to help you know what you are trying to accomplish. Boy, the things I do for you:) Actually, until someone shows you what you are looking for, it is impossible to really achieve good grafts. Oh, and for those of you that have never seen what an egg looks like, where here you go! Once you retrieve your graft, then place it into the cell cup. Repeat this until you have all your cell cups started. Then, take the frame (explain in the previous lesson) and place it into your starter hive, a queenless 5 frame nuc with nurse bees that a) would love to swarm if they had a queen, and b) would love to have a queen, and c) are young and can produce the needed start to your queen cells. However, I have found that I must remove the cells out of this starter hive after 24-36 hours. They just don't seem to have the royal jelly and proteins the queen cells need to seal the cells all the way by the 8th day.
After 24 hours in the starter hive, I moved them to my big hive known as a finishing hive. It is a regular hive, consisting of two deeps, lots of good brood in various stages, honey and pollen. I place the queen in the bottom deep and place a queen excluder on top of that deep. Then, I pull out a frame with bees all over it (and put them in a starter hive if needed) and place my queen cells in this hive in place of the frame I removed. This hive is large enough to care and finish off the 30+ queen cells. Now, on day 10, after the cells are good and sealed, I moved them into my incubator.
B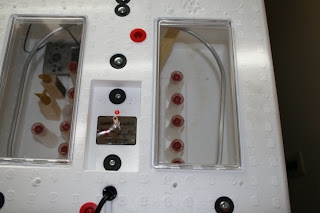 e careful to handle your queen cells carefully, never tilt them from their vertical position. They must be kept at 93 degrees or the queen will die. Keeping track of days is essential. You can be off a day or two because you may not know the exact age of the larvae you grafted, so play it safe. Be watching on day 15, because queens hatch on day 16 after the egg is laid. When the queen emerges, I collect her, put a plug of my candy in her cage and place her in a queenless nuc, which some call a mating nuc. I use a 5 frame nuc rather than the smaller ones simply because I like all my equipment to be interchangeable. She will need some time to mate, usually a week, but sometimes longer if the weather is not right. Once she has been laying good for 2-3 weeks, then she is ready for sale. I've read that if she can lay for 21 days in her nuc, then she will be a better queen. This requires a lot more on our part, to have our yard flooded with 5 frame nuc boxes full of virgin queens. They actually have been mating and starting to lay a lot faster than I thought they would.
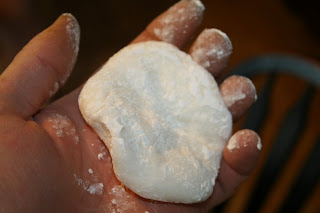 I make my own sugar plugs. Too dry and it becomes hard and the queens can't get out. Too wet, and it will melt in warm weather and the queen could die along with her helpers. I take a thick sugar syrup which is just dissolved sugar in water, and mix it with powered sugar and I usually knead it until it becomes like dough. Then I keep it in the refrigerator and pinch off what I need. When using wooden cells I like to use the wax paper that comes with the wax sheets to cover the top of the sugar to keep it from drying out so fast.Finally, the mated queen is ready to bless someone with a hive that needs a queen! Your work has been rewarding and you can rest at night knowing that somewhere, you queen will be saving a hive, producing honey and bringing someone a lot of enjoyment!
